English


VLESS + Reality Guide: Secure Proxy Setup
Keywords
Before diving into the setup, here are the key terms that are most likely to need clarification in this guide.
| Keyword | Definition |
|---|---|
| 🔐 VLESS | A lightweight proxy protocol from the V2Ray/Xray ecosystem that authenticates users with a UUID and is commonly paired with modern stealth transports like Reality. |
| 🔀 Proxy vs VPN | A proxy usually forwards application traffic through a server, while a traditional VPN typically creates a full virtual network tunnel for the device or system. |
| 🎭 Reality | A stealth transport mechanism for Xray that makes traffic look much closer to normal HTTPS by using browser-like TLS fingerprints and special key-based validation. |
| 🔍 DPI (Deep Packet Inspection) | A network filtering technique that analyzes packet patterns, handshakes, and protocol fingerprints to identify and block traffic such as VPNs and proxies. |
| 🖥️ VPS | A Virtual Private Server that you rent and control remotely, which acts as the host machine for your VLESS + Reality setup. |
| ⚙️ 3x-ui | A web-based management panel for Xray that lets you create inbounds, users, and Reality settings without editing JSON manually. |
| 🚀 Xray | The core proxy engine running underneath 3x-ui that actually handles VLESS, Reality, routing, and client connections. |
| 🆔 UUID | A unique identifier assigned to each client and used by VLESS as the main authentication value. |
| 🌐 SNI | Server Name Indication, a TLS field that tells the server which hostname is being requested and must match the Reality target configuration correctly. |
| 🧬 x25519 Key Pair | The public/private key pair used by Reality so approved clients can complete the connection while unwanted probes are treated differently. |
| 🔑 Public key vs private key | The public key is shared with the client so it can connect, while the private key stays only on the server and must never be exposed. |
| 🧭 uTLS Fingerprint | A browser-imitating TLS client fingerprint, such as chrome, used to make the connection resemble ordinary browser traffic. |
| 📡 Inbound | The server-side listener configuration in Xray/3x-ui that defines how clients connect, including protocol, port, transport, and security settings. |
| ⚡ BBR | A TCP congestion control algorithm from Google that can improve throughput and responsiveness on some VPS network paths. |
| ✅ ACME validation | The public verification step used by certificate services like Let’s Encrypt to confirm that your server or domain is reachable and allowed to request the certificate. |
Setting Up VLESS VPN with Reality Stealth in 2026
The frustration is familiar: you set up a VPN server, everything works perfectly, and then one morning you wake up to find it blocked. The connection that worked yesterday fails today. No changes on your end, yet suddenly nothing works. This isn’t a hypothetical scenario—it’s the reality of using traditional VPN protocols in 2026, where deep packet inspection technology has evolved to identify and block even properly encrypted traffic.

The Problem: Why Standard VPNs Get Blocked
The days when a simple OpenVPN or WireGuard server would work reliably for months—or even years—are over. Deep Packet Inspection (DPI) technology has advanced dramatically, and it’s no longer just about detecting unencrypted traffic. Modern DPI systems examine multiple characteristics of your network traffic to identify VPN connections with remarkable accuracy.

Consider what happens when you connect using standard OpenVPN or WireGuard. The traffic is encrypted, but it still has a recognizable shape. OpenVPN often exposes a TLS handshake and traffic pattern that doesn’t look like an ordinary browser session. WireGuard doesn’t use TLS at all, but its UDP-based handshake and packet behavior are still distinctive enough to stand out on filtered networks. It’s like having a passport with the wrong country code—the document is valid, but the details don’t match any legitimate traveler.
In 2026, this blocking happens faster than ever before. Where once a newly deployed VPN might work for months before being detected, now new servers can be identified within days or even hours of going live. The blocking is also more pervasive, happening at ISP level, corporate network level, and in some jurisdictions, at the national firewall level. You need a solution that doesn’t just encrypt your traffic—it makes your traffic look like something else entirely.
What Is VLESS? The Protocol Explained
VLESS stands for “VMess Less”—a name that directly reflects its design philosophy. It was created as a lighter, simpler successor to the VMess protocol, which was the original default transport protocol in the V2Ray project. Where VMess bundled encryption, authentication, and transport into one tightly coupled system, VLESS strips away the unnecessary layers and leaves a clean, stateless transport protocol.

Here’s the critical distinction: VLESS functions as a proxy, not as a full VPN tunnel. The protocol redirects your traffic through the server rather than creating a complete virtual network interface. For most users, this distinction is academic—the functional result is exactly what you expect from a VPN: your traffic appears to originate from the server’s IP address. But this proxy architecture is precisely why VLESS works so well with Reality, as the lighter protocol overhead allows the stealth mechanism to operate without interference.
The proxy design also means less overhead compared to traditional VPN protocols. There’s no kernel-level tunnel interface to manage, no additional encryption layers beyond what’s necessary, and the protocol was designed from the ground up to work with modern TLS-based stealth mechanisms. This simplicity is a feature, not a limitation—it means fewer things that can go wrong and fewer fingerprints that can be detected.
Understanding Reality: The Stealth Technology
Reality is what transforms VLESS from another proxy protocol into something much harder to distinguish from ordinary encrypted web traffic. The mechanism is elegant in its simplicity: instead of trying to hide what you’re doing, Reality makes your traffic look like something else entirely.

Reality achieves this through a technique that operates at the TLS handshake level. When a client connects to your server, it sends a TLS ClientHello that mimics a real browser—using the uTLS library to replicate the fingerprint of Chrome, Firefox, or another popular browser. The server then validates the connection using Reality’s key material and client parameters built around an x25519 key pair. If the client presents the expected Reality values, the connection proceeds as a VLESS proxy. If it does not—which is what happens when a DPI system or active probe hits your server—the traffic is forwarded to a legitimate target website such as www.microsoft.com or www.apple.com. To the probing system, your server looks like a normal website rather than an obvious proxy endpoint.
Think of it like wearing a uniform. A border guard inspecting vehicles doesn’t check every car thoroughly—they wave through ones that look legitimate based on their registration, plates, and driver appearance. Your traffic wears the uniform of a major corporation, so the network inspector waves it through without the detailed inspection that would reveal it’s actually something else. The uTLS fingerprint is the disguise, and the x25519 key exchange is the secret handshake that only your client knows.
A critical point: you don’t need your own domain for this to work. Previous stealth methods required you to own a domain and obtain Let’s Encrypt certificates, which created a paper trail and additional complexity. Reality requires nothing but a VPS IP address. The target websites (Microsoft, Apple, Google) have near-100% uptime and support the latest TLS 1.3 protocol, making them perfect anchors for this technique.
Port 443 gives this disguise its best chance of blending in. Standard HTTPS traffic normally uses port 443, so keeping Reality on that port makes the connection look much closer to ordinary web browsing. Other ports may work technically, but they weaken the camouflage because they no longer match the default shape of everyday HTTPS traffic.
Common Misconceptions
Before moving forward, let’s address three misconceptions that trip up people exploring VLESS + Reality for the first time.
“VLESS is a VPN.” In technical terms, VLESS is a proxy protocol, not a VPN in the traditional sense. There’s no TUN/TAP interface, no virtual network adapter, and no routing table manipulation. However, from a user’s functional perspective, it provides exactly what you’d expect from a VPN—your internet traffic appears to come from the server’s IP address. The distinction matters for network engineers but rarely matters for end users.
“Reality needs a domain.” This was true of earlier stealth techniques that used self-owned domains and Let’s Encrypt certificates. Reality specifically was designed to work without any domain you control. It uses browser fingerprint mimicry and x25519 key authentication, meaning you don’t need to register, manage, or renew anything. Set it up once and it continues working.
“This is unhackable.” Nothing is unhackable. Reality is highly resistant to detection and blocking because it genuinely looks like normal HTTPS traffic. But it’s not immune to future improvements in DPI technology, potential protocol fingerprinting, or targeted attacks. What it provides is the best available protection in 2026 against the most common forms of network filtering. Treat it as a robust solution, not a magic shield.
What You Need Before Starting
You’ll need a VPS from any provider (i.e. AvaHost), and similar services all work fine. For typical single-user performance, a basic plan with 1 CPU core and 1GB RAM is sufficient. The server should run Ubuntu 22.04 LTS or 24.04 LTS; these versions have kernel support for the required networking features out of the box.
Root SSH access is essential. You need the ability to connect to your server via the command line and execute privileged commands. Most VPS providers offer this by default—you’ll receive an IP address, username (usually root), and either a password or SSH key after deployment.
For client applications, depending on your devices you’ll need: v2rayNG for Android, v2rayN for Windows, V2Box or Streisand for macOS, and Shadowrocket or FoXray for iOS. We’ll cover these in detail in the client applications section later in this guide.
One significant advantage of the Reality method: you don’t need a domain you control. Many stealth setups require you to register and manage one, but Reality can work directly from the VPS IP while borrowing the look of a legitimate TLS destination.
A brief note on legal considerations: The techniques described in this guide are intended for legitimate privacy and access needs. Internet filtering laws vary significantly by jurisdiction. Ensure that your use of these tools complies with the applicable laws in your region.
Server Preparation: BBR and Basics
With prerequisites verified, let’s prepare the server. This phase optimizes your VPS before installing any software, ensuring maximum performance from the start.
💡 TIP: Use BBR before deploying — it often improves throughput and latency on constrained or higher-latency links.
First, update your system packages. This ensures you have the latest security updates and required dependencies:
apt update && apt upgrade -y
This step may take 1-5 minutes depending on your VPS provider and network speed. Some providers pre-update their images during deployment, so this might complete quickly on some systems.
Next, enable Google BBR congestion control. BBR (Bottleneck Bandwidth and Round-trip propagation time) is Google’s congestion control algorithm. Instead of relying mainly on packet loss as a signal, it tries to model available bandwidth and round-trip time more directly, which can improve throughput and responsiveness on some VPS links.
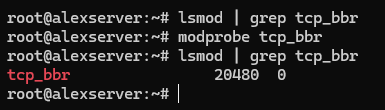
# Verify BBR module is available
 lsmod | grep tcp_bbr
If nothing appears, load the module manually:
modprobe tcp_bbr
Now create the sysctl configuration to enable BBR persistently:
cat >> /etc/sysctl.d/99-bbr.conf << 'EOF'
 net.core.default_qdisc=fq
 net.ipv4.tcp_congestion_control=bbr
 EOF

Apply the configuration:
sysctl -p /etc/sysctl.d/99-bbr.conf
Verify BBR is active:
sysctl net.ipv4.tcp_congestion_control
 sysctl net.ipv4.tcp_available_congestion_control
You should see bbr as the active algorithm.

Some systems benefit from a reboot after enabling BBR—it ensures the module loads properly and all network optimizations take effect:
reboot
Now make sure port 443 is reachable. If you plan to use the 3x-ui installer’s built-in Let’s Encrypt flow for the panel, allow 80/tcp as well — that port is used for ACME certificate validation, not for the panel itself. If your VPS provider also has a cloud firewall or security group layer, allow the same ports there too. On Ubuntu, the safest path is usually UFW.
# If this is a remote VPS and you're enabling UFW for the first time, allow SSH before enabling the firewall
 ufw allow OpenSSH
 # Allow HTTPS-style Reality traffic
 ufw allow 443/tcp
 # Allow ACME validation for the 3x-ui panel's built-in Let's Encrypt setup
 ufw allow 80/tcp
 # Review rules, then enable only if UFW is not already active
 ufw status
 ufw enable
⚠️ WARNING: Port 443 is strongly recommended because it matches normal HTTPS traffic. Other ports may work technically, but they blend in less naturally and make the setup easier to flag.
Your server is now optimized and ready for the 3x-ui installation.
Installing 3x-ui Panel
Before you run the installer, note one easy-to-miss requirement: if you want the installer’s built-in Let’s Encrypt setup to issue an SSL certificate for the panel, 80/tcp must be open and reachable from the public internet. This ACME validation port is separate from the panel port you choose during setup.
Run the installation command:
bash <(curl -Ls https://raw.githubusercontent.com/mhsanaei/3x-ui/master/install.sh)
Current versions of the installer do not begin with the older numbered Install / Update / Uninstall menu that many tutorials still show. Instead, the script starts installation immediately, installs any missing dependencies, downloads the latest release, and then walks you through the panel setup prompts.
A typical install flow now looks like this:
- Choose whether to set a custom panel port or let the installer generate a random one.
- Let the installer generate a random username, password, and webBasePath.
- Choose how to configure panel SSL:
- 1 = Let’s Encrypt for a domain
- 2 = Let’s Encrypt for the server IP
- 3 = use an existing certificate
- Complete the certificate prompts if you use the built-in Let’s Encrypt flow.
⚠️ IMPORTANT: The panel port is not the same thing as the ACME validation port. You might run the panel on a random port such as 13525 and still need public 80/tcp open so Let’s Encrypt can validate the certificate.
The important rule is simple: use the exact credentials, path, and URL printed by your own installer, not assumptions copied from older tutorials.
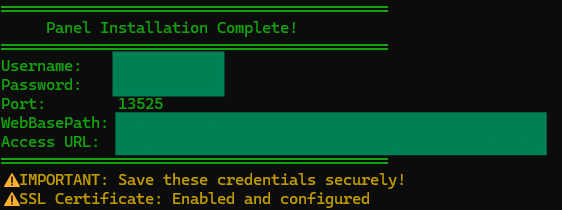
Your final output will look more like this:
Username:    GENERATED_USERNAME
Password:    GENERATED_PASSWORD
Port:        13525
WebBasePath: RANDOM_PATH
Access URL:  https://YOUR_SERVER_IP:13525/RANDOM_PATH
Verify the service is running:
systemctl status x-ui
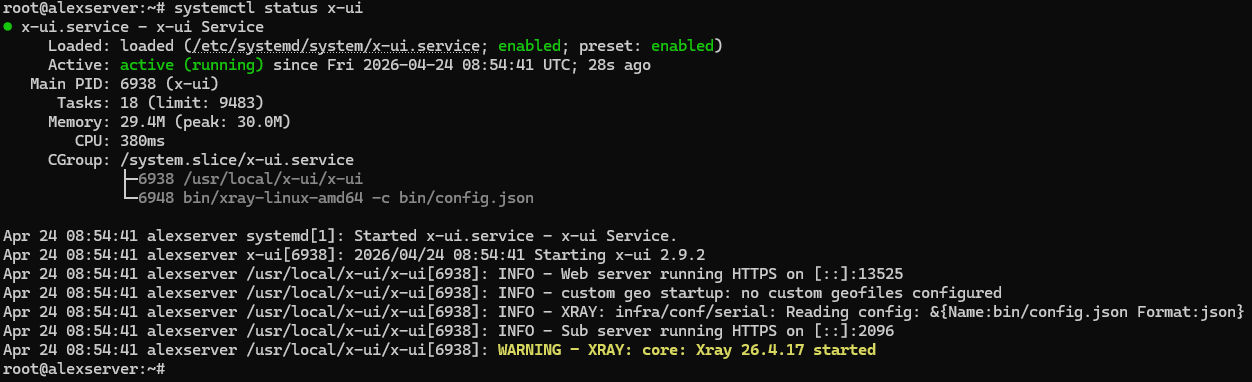
This check matters. Look specifically at the web server line in the status output:
- If you see Web server running HTTPS …, panel SSL is working correctly.
- If you see Web server running HTTP …, the panel installed successfully but the SSL setup did not complete.
Access the panel using the exact URL, username, and password generated by your own install. Do not assume the path is /panel, and do not assume the credentials are admin/admin unless your own install explicitly says so.
💡 TIP 1: To view again the current panel settings and print the Access URL, in the CLI run “x-ui” command, and choose number 10 “View Current Settings” from the menu output.
💡 TIP 2: If the access URL does not load, make sure the 3x-ui panel port is open on your VPS firewall. For example, if your panel is running on port “13525”, allow it with: ” ufw allow 13525/tcp “. Replace 13525 with the actual port you configured for the 3x-ui panel.
If the installer finishes but systemctl status x-ui shows HTTP instead of HTTPS
The most common cause is that 80/tcp was not reachable from the public internet during Let’s Encrypt validation. In that case, the panel may still install and start, but certificate issuance fails.
Fix the firewall first:
ufw allow 80/tcp
 ufw status
If your VPS provider has a cloud firewall or security group layer, allow 80/tcp there too. Then rerun panel certificate setup from the 3x-ui management script:
x-ui
For an IP-based panel certificate, choose:
- 19 → 6 (Get SSL for IP Address)
For a domain-based panel certificate, choose:
- 19 → 1 (Get SSL (Domain))
After the certificate is issued, verify again:
systemctl status x-ui
You want the status output to show Web server running HTTPS … before continuing.
💡 TIP: Save the generated credentials and panel URL immediately. Also note that the installer summary can be misleading if certificate issuance fails — if the final block prints an HTTPS URL but systemctl status x-ui still shows HTTP, trust the service status output and fix SSL before moving on.
Configuring VLESS + Reality Inbound
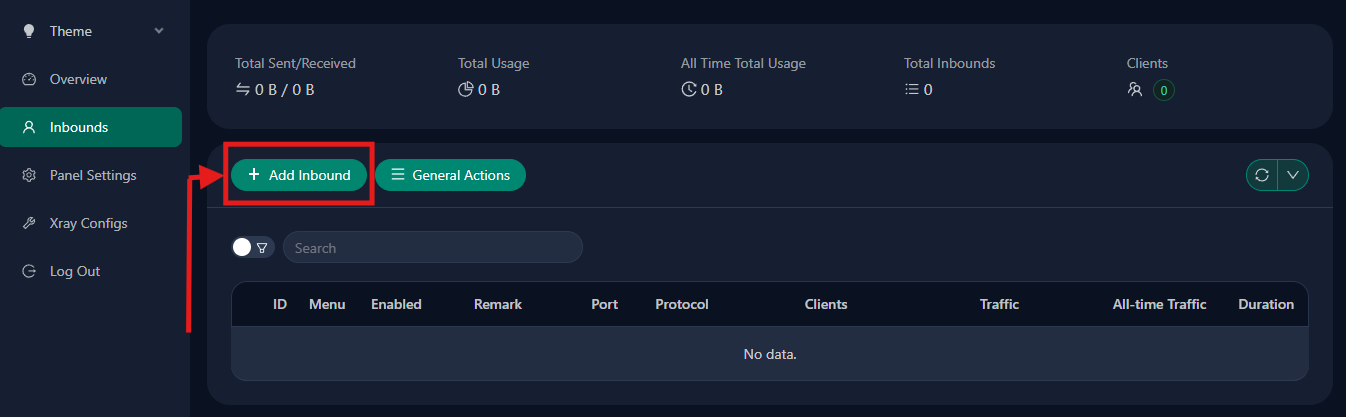
This is the critical configuration step where your VPN-like system actually gets created. Within the 3x-ui panel, navigate to Inbounds → Add Inbound.
Configure the fields as follows:
| Field | Value | Notes |
|---|---|---|
| Protocol | VLESS | Select from dropdown |
| Listen IP | 0.0.0.0 | Default / all interfaces |
| Port | 443 | Recommended for the most natural HTTPS camouflage |
| Client → Authentication | Leave empty / default | Do not use Get New keys for this basic setup |
| Client → decryption | none | Required for VLESS |
| Client → encryption | none | Leave at default |
| Client → Flow | xtls-rprx-vision | Set this in the Client subsection. If you do not see this field yet, first set Transmission to TCP (RAW) and Security to reality. |
| Transmission | TCP (RAW) | Use direct TCP transport |
| Security | reality | Select from the security options |
| uTLS | chrome | Use a common browser fingerprint |
| Target | www.microsoft.com:443 | Stable TLS 1.3 target for fallback/probing |
| SNI | www.microsoft.com | Keep it aligned with Target |
| Short IDs | Generate or use panel default | Copy one generated value to the client |
| SpiderX | / | Simple default |
| Public Key | Generate with Get New Cert | Copy this to the client |
| Private Key | Generate with Get New Cert | Keep this on the server only |
📋 NOTE: Leave the other visible fields — such as Total Flow, Traffic Reset, Duration, Fallbacks, Proxy Protocol, HTTP Obfuscation, Sockopt, External Proxy, Show, Xver, Max Time Diff, Min Client Ver, Max Client Ver, Sniffing, and the ML-DSA fields — at their defaults for this basic setup.
Finally, click Save to create the inbound.
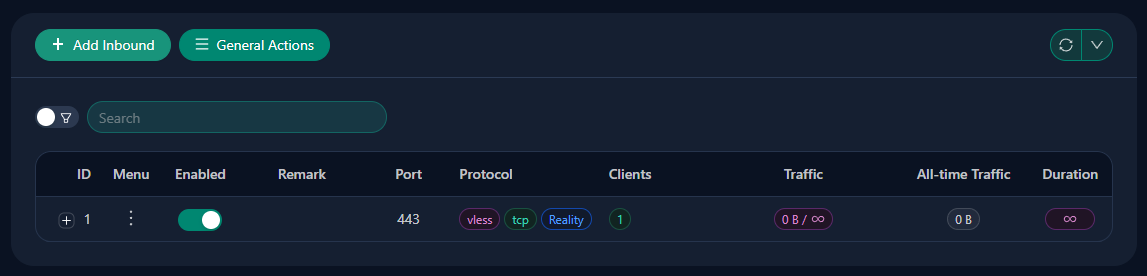
⚠️ WARNING: Port 443 is the best default because it matches ordinary HTTPS traffic. If you change it, the inbound may still work, but it no longer blends in as cleanly.
⚠️ WARNING: The Reality target must support TLS 1.3 — Microsoft, Apple, and Google are safe bets. Using a target that doesn’t support TLS 1.3 will cause Reality to fail, as the protocol is designed specifically for TLS 1.3 handshakes.
The reason these values matter: port 443 gives you the most believable HTTPS profile, a stable TLS 1.3 target gives probes somewhere legitimate to land, and the chrome fingerprint keeps the client side aligned with one of the most common browser fingerprints on the internet. Start simple, get one working path, then expand later if you need multiple targets.
User Management in 3x-ui
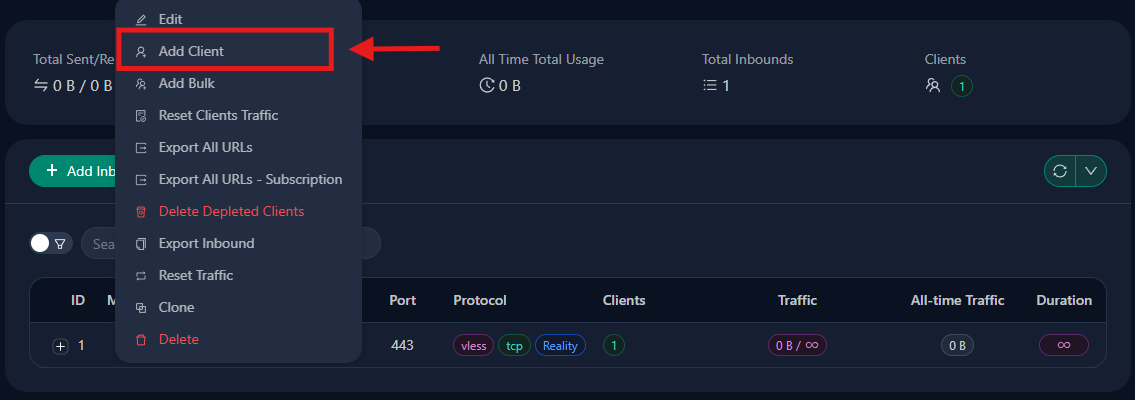
With the inbound configured, you need to create user connections that your devices will use to authenticate. In 3x-ui, navigate to Inbounds → [Click on your VLESS inbound Menu] → Add Client.
Each user gets a unique UUID (automatically generated), along with an email for identification and optional traffic/expiry limits. When you create a client, the panel generates the values you need for connection: server address, UUID, flow, public key, short ID, and SNI-related settings.
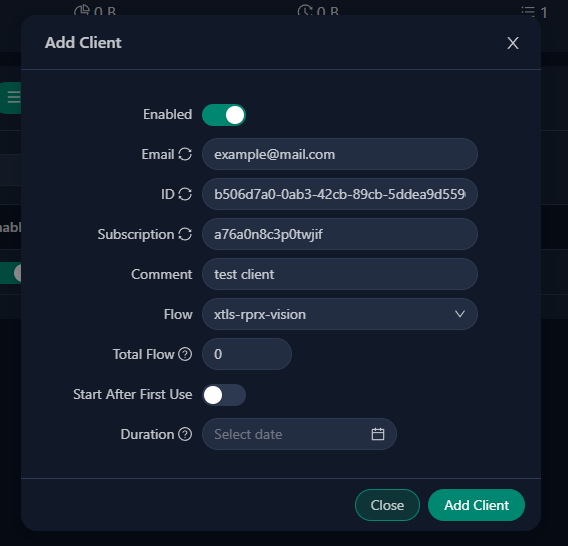
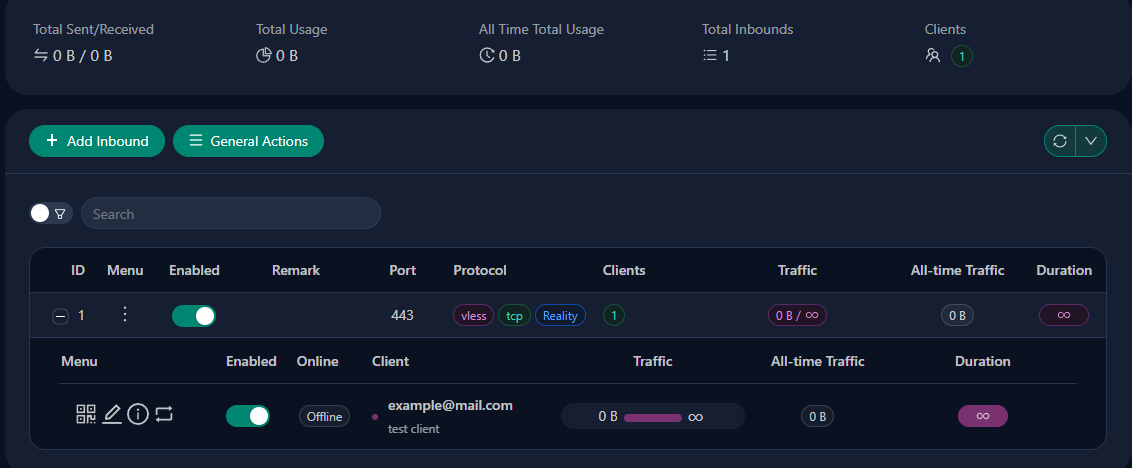
By pressing the plus (“+”) sign of the selected inbound, the user list will appear.
Exporting a client
To export a single client’s connection details, first expand the inbound row so the clients table is visible. In the client row, use the two per-client export actions:
- QR icon → opens the QR modal
- Info icon → opens the details modal
These correspond to the first two sharing methods.
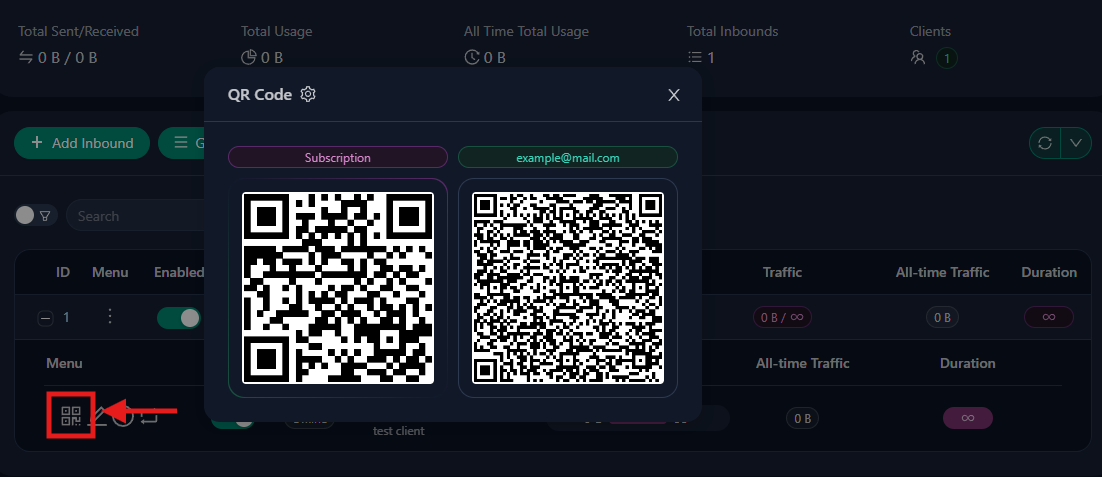
QR Code: Click the client’s QR icon. If subscriptions are enabled, the QR modal may show two QR codes:
- Subscription → a QR for the client’s subscription URL
- Client QR (labeled with the client email or identifier, such as example@mail.com) → a QR for the direct VLESS Reality URI
The subscription QR is useful for clients that support automatic updates. The client QR is the one-off direct import for that specific client.
Share Link / URL: Click the client’s Info icon. In the details modal, you may see two text export types:
- Subscription URL → a refreshable subscription endpoint
- URL → the direct VLESS Reality URI for that client
Use the copy button next to the URL section for desktop import.

At minimum, a usable direct Reality URI should include populated values such as:
type=tcp
encryption=none
security=reality
sni=www.microsoft.com
fp=chrome
pbk=YOUR_PUBLIC_KEY
sid=YOUR_SHORT_ID
spx=/
flow=xtls-rprx-vision
pbk= is the Reality public key and belongs in the direct VLESS URI. The subscription URL itself will not usually contain pbk= because it is only the fetch endpoint; the returned configuration contains the actual Reality parameters.
Some 3x-ui versions have had Reality share-link bugs where pbk= is empty. If the direct URI is missing pbk= or sid=, do not trust it blindly. In that case, use manual configuration instead.
Manual Configuration: There is no separate “manual config” export button. In practice, manual configuration means either entering the values directly into the client app or composing and verifying the final VLESS Reality URI yourself from the raw values. Collect the required values from:
- the Info modal: server address, port, UUID, flow, and the direct URI
- the inbound’s Reality settingsSNI, public key, short ID, fingerprint (chrome), and SpiderX (/) if needed
You can create multiple users for different devices or different people. Each UUID is independent, so revoking access for one user doesn’t affect others.
Manual Xray Configuration (Brief)
Some users prefer not to use a graphical interface and want to edit Xray configuration directly. On a standard Linux 3x-ui install, the active runtime config is written to /usr/local/x-ui/bin/config.json, so you can inspect it or make temporary manual changes there.
Treat that file as a generated runtime artifact, not the panel’s source of truth. 3x-ui rebuilds config.json from its database-backed settings, so manual edits can be overwritten when Xray restarts or when you save changes in the panel.
Before you edit it, create a backup:
cp /usr/local/x-ui/bin/config.json /usr/local/x-ui/bin/config.json.bak
Manual editing can be useful for quick testing or debugging, but incorrect JSON can stop Xray from starting. If 3x-ui meets your needs, stick with the panel for persistent changes and use direct config.json edits only for advanced cases.
Client Applications by Platform
To connect to your server, you’ll need client software on your devices. Here’s what’s available:
| Platform | Recommended Apps | Notes |
|---|---|---|
| Windows | v2rayN | GUI client with system tray integration |
| macOS | V2Box, Streisand | V2Box is free; Streisand is on App Store |
| Android | v2rayNG, NekoBox | Both available on GitHub and F-Droid |
| iOS | Shadowrocket, FoXray, V2Box | Shadowrocket is paid; FoXray availability may vary |
For Windows, v2rayN is the recommended choice—it’s actively maintained, has a clean interface, and handles Reality configuration natively. For mobile, v2rayNG and V2Box both support QR code import, making setup quick.
📋 NOTE: Apple-platform client availability changes frequently. If a listed app is unavailable in your region, check the project’s official site, App Store listing, or TestFlight path before assuming the protocol itself is the problem.
Connecting Your First Client
Let’s walk through connecting a Windows client using v2rayN—the process is similar on other platforms, but this gives you a complete example.
Step 1: Download v2rayN
Visit https://github.com/2dust/v2rayN/releases and download the current Windows desktop build. As of 2026, the simplest option is usually v2rayN-windows-64-desktop.zip (or the current equivalent desktop package shown on the release page).
Step 2: Extract and Run
Extract the ZIP to a folder (e.g., C:\v2rayN). Run v2rayN.exe. Recent desktop builds are typically self-contained, so you usually do not need to install a separate .NET desktop runtime. The application appears in your system tray.
Step 3: Import Configuration
For this connection, use the direct VLESS URL from 3x-ui — the one that starts with vless:// — not the subscription URL. If your exported Reality link is missing required values such as pbk= or sid=, go back to the previous 3x-ui section and use the manual values from the inbound settings instead.
In v2rayN, open the Configuration menu in the top-left area of the window. The easiest method is to copy the direct VLESS URL from 3x-ui and then select Configuration → Import Share Links from clipboard. On most builds, you can also simply press Ctrl+V. Make sure you copied the direct VLESS URL first, so the app can paste in the value.
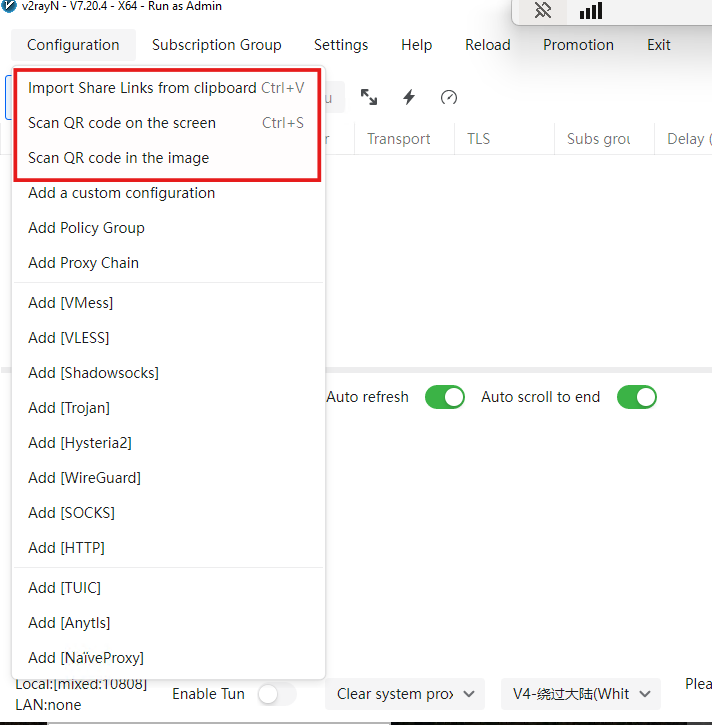
If clipboard import is not the desired option, then the QR code or manual import can be also used.
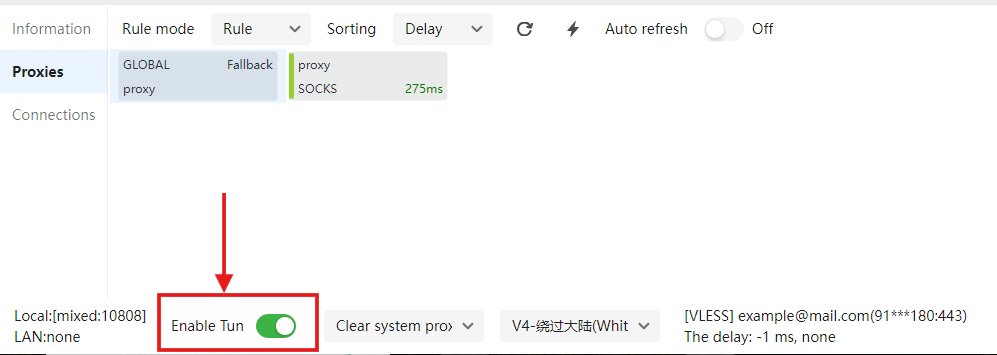
Step 4: Connect
After the client has been imported, in order to make the tunnel between windows client and server active, press the “Enable tunnel” at the bottom of v2rayN UI.
Step 5: Verify
Open your browser and visit https://whatismyipaddress.com/ or https://ip.sb. The IP address displayed should be your server’s IP, not your local IP. This confirms your traffic is routing through the VPN.
Verifying Your Setup
Connection verification confirms everything works as expected. Beyond checking your IP address in the browser, there are a few additional tests worth running.
IP Address Check: Visit https://whatismyipaddress.com/ or https://ip.sb while connected. The displayed IP should match your VPS server IP, not your home or local network IP.
DNS Leak Test: Visit https://dnsleak.com or https://browserleaks.com/dns and run the test. A properly configured client should not expose your normal local DNS resolvers while the proxy is active.
Common Issues and Solutions
| Issue | Cause | Solution |
|---|---|---|
| No connection | Port 443 blocked | Check firewall: ufw allow 443/tcp and cloud provider console |
| Panel won’t open | Wrong URL or old /panel assumption | Use the exact HTTPS URL printed by the installer |
| Imported link won’t connect | Reality link missing pbk or sid | Inspect the link or switch to manual client configuration |
| Connection timeout | Wrong SNI | Verify SNI matches (www.microsoft.com) in client settings |
| TLS error | Wrong fingerprint or mismatched Reality values | Set fingerprint to chrome and recheck SNI, public key, and short ID |
| Slow speed | BBR not enabled | Re-enable BBR per server preparation section |
| “No server response” | Firewall blocking | Check both server firewall and cloud provider security groups |
If you encounter issues, verify your client configuration matches exactly what was generated in 3x-ui—the UUID, SNI, public key, short ID, and flow must all match between server and client.
Next Steps & Advanced Options
You now have a working VLESS + Reality VPN. From here, several enhancements are available:
Add a backup inbound carefully: If you genuinely need a fallback, you can add something like VMess + WebSocket as a secondary inbound. Just remember that every extra inbound increases complexity and gives you one more surface to secure and troubleshoot.
Scale for multiple users: Create additional clients in 3x-ui for family members or devices. Each gets a unique UUID, and you can track usage separately.
Performance tuning: BBR is already enabled, but you can explore TCP/UDP optimization, network buffer tuning, and server-side TCP tuning for marginal improvements.
Alternative SNI targets: While Microsoft/Apple/Google are reliable, some users prefer www.oracle.com or other targets. The principle remains the same—any site with valid TLS 1.3 certificates works.
Panel security: Restrict the panel port to your own admin IP if possible, rotate credentials if you chose them manually, and consider installing Fail2Ban to protect the panel from brute-force attempts.
Conclusion
VLESS + Reality is a strong self-hosted option for 2026 if you need a setup that blends in better than traditional VPN protocols. Its advantage is not magic invisibility; it’s that the traffic looks much closer to ordinary encrypted web traffic than OpenVPN- or WireGuard-style connections do on heavily filtered networks.
If you understand the mental model—browser-like TLS fingerprinting, Reality key material, a believable target, and a standard HTTPS port—you’ll have a much easier time deploying, debugging, and maintaining the setup. From here, the natural next steps are tightening panel security, adding more client devices, and validating which targets and client apps work best for your own environment. For hosting, providers like AvaHost can give you a stable base to run your VLESS + Reality setup, ensuring reliable uptime and straightforward management.
Related Posts